MNIST 教程#
欢迎来到 Flax NNX!在本教程中,您将学习如何使用 Flax NNX API 构建和训练一个简单的卷积神经网络 (CNN),以对 MNIST 数据集上的手写数字进行分类。
Flax NNX 是一个基于 JAX 构建的 Python 神经网络库。如果您之前使用过 Flax Linen API,请查看 为什么选择 Flax NNX。您应该具备一些深度学习的主要概念知识。
让我们开始吧!
1. 安装 Flax#
如果您的 Python 环境中没有安装 flax,请使用 pip 从 PyPI 安装该软件包(如果您在 Google Colab/Jupyter Notebook 中工作,请取消注释单元格中的代码)
# !pip install flax
2. 加载 MNIST 数据集#
首先,您需要加载 MNIST 数据集,然后通过 Tensorflow Datasets (TFDS) 准备训练集和测试集。 您需要规范化图像值、打乱数据、将其分成批次,并预取样本以提高性能。
import tensorflow_datasets as tfds  # TFDS to download MNIST.
import tensorflow as tf  # TensorFlow / `tf.data` operations.

tf.random.set_seed(0)  # Set the random seed for reproducibility.

train_steps = 1200
eval_every = 200
batch_size = 32

train_ds: tf.data.Dataset = tfds.load('mnist', split='train')
test_ds: tf.data.Dataset = tfds.load('mnist', split='test')

train_ds = train_ds.map(
  lambda sample: {
    'image': tf.cast(sample['image'], tf.float32) / 255,
    'label': sample['label'],
  }
)  # normalize train set
test_ds = test_ds.map(
  lambda sample: {
    'image': tf.cast(sample['image'], tf.float32) / 255,
    'label': sample['label'],
  }
)  # Normalize the test set.

# Create a shuffled dataset by allocating a buffer size of 1024 to randomly draw elements from.
train_ds = train_ds.repeat().shuffle(1024)
# Group into batches of `batch_size` and skip incomplete batches, prefetch the next sample to improve latency.
train_ds = train_ds.batch(batch_size, drop_remainder=True).take(train_steps).prefetch(1)
# Group into batches of `batch_size` and skip incomplete batches, prefetch the next sample to improve latency.
test_ds = test_ds.batch(batch_size, drop_remainder=True).prefetch(1)
/usr/local/google/home/cgarciae/flax/.venv/lib/python3.10/site-packages/tqdm/auto.py:21: TqdmWarning: IProgress not found. Please update jupyter and ipywidgets. See https://ipywidgets.readthedocs.io/en/stable/user_install.html
  from .autonotebook import tqdm as notebook_tqdm
2024-07-10 15:24:11.227958: I tensorflow/core/platform/cpu_feature_guard.cc:210] This TensorFlow binary is optimized to use available CPU instructions in performance-critical operations.
To enable the following instructions: AVX2 FMA, in other operations, rebuild TensorFlow with the appropriate compiler flags.
2024-07-10 15:24:12.227896: W tensorflow/compiler/tf2tensorrt/utils/py_utils.cc:38] TF-TRT Warning: Could not find TensorRT
3. 使用 Flax NNX 定义模型#
通过继承 nnx.Module,使用 Flax NNX 创建用于分类的 CNN
from flax import nnx  # The Flax NNX API.
from functools import partial

class CNN(nnx.Module):
  """A simple CNN model."""

  def __init__(self, *, rngs: nnx.Rngs):
    self.conv1 = nnx.Conv(1, 32, kernel_size=(3, 3), rngs=rngs)
    self.conv2 = nnx.Conv(32, 64, kernel_size=(3, 3), rngs=rngs)
    self.avg_pool = partial(nnx.avg_pool, window_shape=(2, 2), strides=(2, 2))
    self.linear1 = nnx.Linear(3136, 256, rngs=rngs)
    self.linear2 = nnx.Linear(256, 10, rngs=rngs)

  def __call__(self, x):
    x = self.avg_pool(nnx.relu(self.conv1(x)))
    x = self.avg_pool(nnx.relu(self.conv2(x)))
    x = x.reshape(x.shape[0], -1)  # flatten
    x = nnx.relu(self.linear1(x))
    x = self.linear2(x)
    return x

# Instantiate the model.
model = CNN(rngs=nnx.Rngs(0))
# Visualize it.
nnx.display(model)
运行模型#
让我们测试一下 CNN 模型!在这里,您将使用任意数据执行前向传播并打印结果。
import jax.numpy as jnp  # JAX NumPy

y = model(jnp.ones((1, 28, 28, 1)))
nnx.display(y)
4. 创建优化器并定义一些指标#
在 Flax NNX 中,您需要创建一个 nnx.Optimizer 对象来管理模型的参数并在训练期间应用梯度。nnx.Optimizer 接收模型的引用,以便它可以更新其参数,并接收一个 Optax 优化器来定义更新规则。此外,您将定义一个 nnx.MultiMetric 对象来跟踪 Accuracy 和 Average 损失。
import optax

learning_rate = 0.005
momentum = 0.9

optimizer = nnx.Optimizer(model, optax.adamw(learning_rate, momentum))
metrics = nnx.MultiMetric(
  accuracy=nnx.metrics.Accuracy(),
  loss=nnx.metrics.Average('loss'),
)

nnx.display(optimizer)
5. 定义训练步骤函数#
在本节中,您将使用交叉熵损失 (optax.softmax_cross_entropy_with_integer_labels()) 定义一个损失函数,CNN 模型将在此损失函数上进行优化。
除了 loss 之外,在训练和测试期间,您还将获得 logits,这将用于计算准确率指标。
在训练期间 - train_step - 您将使用 nnx.value_and_grad 来计算梯度,并使用您已经定义的 optimizer 更新模型的参数。在训练和测试期间(eval_step),loss 和 logits 将用于计算指标。
def loss_fn(model: CNN, batch):
  logits = model(batch['image'])
  loss = optax.softmax_cross_entropy_with_integer_labels(
    logits=logits, labels=batch['label']
  ).mean()
  return loss, logits

@nnx.jit
def train_step(model: CNN, optimizer: nnx.Optimizer, metrics: nnx.MultiMetric, batch):
  """Train for a single step."""
  grad_fn = nnx.value_and_grad(loss_fn, has_aux=True)
  (loss, logits), grads = grad_fn(model, batch)
  metrics.update(loss=loss, logits=logits, labels=batch['label'])  # In-place updates.
  optimizer.update(grads)  # In-place updates.

@nnx.jit
def eval_step(model: CNN, metrics: nnx.MultiMetric, batch):
  loss, logits = loss_fn(model, batch)
  metrics.update(loss=loss, logits=logits, labels=batch['label'])  # In-place updates.
在上面的代码中,nnx.jit 转换装饰器会追踪 train_step 函数,以便使用 XLA 进行即时编译,从而优化硬件加速器(如 Google TPU 和 GPU)的性能。nnx.jit 是 jax.jit 转换的“提升”版本,允许其函数输入和输出为 Flax NNX 对象。同样,nnx.value_and_grad 是 jax.value_and_grad 的提升版本。请查看 提升转换指南以了解更多信息。
注意:该代码演示了如何对模型、优化器和指标执行多个原地更新,但状态更新并未显式返回。这是因为 Flax NNX 转换遵循 Flax NNX 对象的引用语义,并将传播作为输入参数传递的对象的的状态更新。这是 Flax NNX 的一个关键功能,它允许代码更加简洁和易读。您可以在 为什么选择 Flax NNX 中了解更多信息。
6. 训练和评估模型#
现在,您可以使用批量数据训练 CNN 模型 10 个 epoch,在每个 epoch 之后评估模型在测试集上的性能,并在此过程中记录训练和测试指标(损失和准确率)。通常,这会导致模型达到大约 99% 的准确率。
metrics_history = {
  'train_loss': [],
  'train_accuracy': [],
  'test_loss': [],
  'test_accuracy': [],
}

for step, batch in enumerate(train_ds.as_numpy_iterator()):
  # Run the optimization for one step and make a stateful update to the following:
  # - The train state's model parameters
  # - The optimizer state
  # - The training loss and accuracy batch metrics
  train_step(model, optimizer, metrics, batch)

  if step > 0 and (step % eval_every == 0 or step == train_steps - 1):  # One training epoch has passed.
    # Log the training metrics.
    for metric, value in metrics.compute().items():  # Compute the metrics.
      metrics_history[f'train_{metric}'].append(value)  # Record the metrics.
    metrics.reset()  # Reset the metrics for the test set.

    # Compute the metrics on the test set after each training epoch.
    for test_batch in test_ds.as_numpy_iterator():
      eval_step(model, metrics, test_batch)

    # Log the test metrics.
    for metric, value in metrics.compute().items():
      metrics_history[f'test_{metric}'].append(value)
    metrics.reset()  # Reset the metrics for the next training epoch.

    print(
      f"[train] step: {step}, "
      f"loss: {metrics_history['train_loss'][-1]}, "
      f"accuracy: {metrics_history['train_accuracy'][-1] * 100}"
    )
    print(
      f"[test] step: {step}, "
      f"loss: {metrics_history['test_loss'][-1]}, "
      f"accuracy: {metrics_history['test_accuracy'][-1] * 100}"
    )
2024-07-10 15:24:26.290421: W tensorflow/core/framework/local_rendezvous.cc:404] Local rendezvous is aborting with status: OUT_OF_RANGE: End of sequence
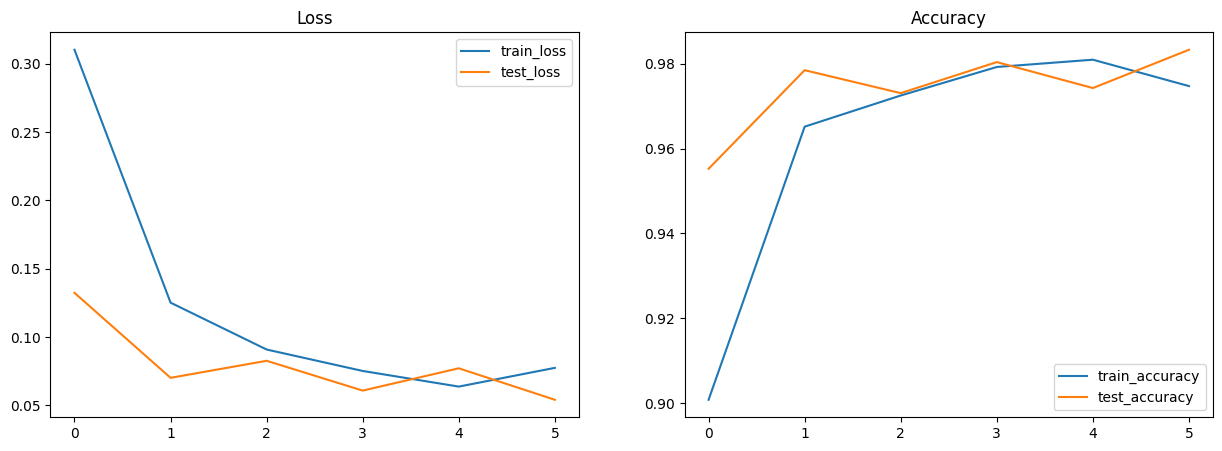
[train] step: 200, loss: 0.3102289140224457, accuracy: 90.08084869384766
[test] step: 200, loss: 0.13239526748657227, accuracy: 95.52284240722656
2024-07-10 15:24:32.398018: W tensorflow/core/framework/local_rendezvous.cc:404] Local rendezvous is aborting with status: OUT_OF_RANGE: End of sequence
[train] step: 400, loss: 0.12522409856319427, accuracy: 96.515625
[test] step: 400, loss: 0.07021520286798477, accuracy: 97.8465576171875
2024-07-10 15:24:38.439548: W tensorflow/core/framework/local_rendezvous.cc:404] Local rendezvous is aborting with status: OUT_OF_RANGE: End of sequence
[train] step: 600, loss: 0.09092658758163452, accuracy: 97.25
[test] step: 600, loss: 0.08268354833126068, accuracy: 97.30569458007812
2024-07-10 15:24:44.516602: W tensorflow/core/framework/local_rendezvous.cc:404] Local rendezvous is aborting with status: OUT_OF_RANGE: End of sequence
[train] step: 800, loss: 0.07523862272500992, accuracy: 97.921875
[test] step: 800, loss: 0.060881033539772034, accuracy: 98.036865234375
2024-07-10 15:24:50.557494: W tensorflow/core/framework/local_rendezvous.cc:404] Local rendezvous is aborting with status: OUT_OF_RANGE: End of sequence
[train] step: 1000, loss: 0.063808374106884, accuracy: 98.09375
[test] step: 1000, loss: 0.07719086110591888, accuracy: 97.4258804321289
2024-07-10 15:24:54.450444: W tensorflow/core/kernels/data/cache_dataset_ops.cc:858] The calling iterator did not fully read the dataset being cached. In order to avoid unexpected truncation of the dataset, the partially cached contents of the dataset will be discarded. This can happen if you have an input pipeline similar to `dataset.cache().take(k).repeat()`. You should use `dataset.take(k).cache().repeat()` instead.
[train] step: 1199, loss: 0.07750937342643738, accuracy: 97.47173309326172
[test] step: 1199, loss: 0.05415954813361168, accuracy: 98.32732391357422
2024-07-10 15:24:56.610632: W tensorflow/core/framework/local_rendezvous.cc:404] Local rendezvous is aborting with status: OUT_OF_RANGE: End of sequence
2024-07-10 15:24:56.615182: W tensorflow/core/framework/local_rendezvous.cc:404] Local rendezvous is aborting with status: OUT_OF_RANGE: End of sequence
7. 可视化指标#
您可以使用 Matplotlib 创建损失和准确率的图表
import matplotlib.pyplot as plt  # Visualization

# Plot loss and accuracy in subplots
fig, (ax1, ax2) = plt.subplots(1, 2, figsize=(15, 5))
ax1.set_title('Loss')
ax2.set_title('Accuracy')
for dataset in ('train', 'test'):
  ax1.plot(metrics_history[f'{dataset}_loss'], label=f'{dataset}_loss')
  ax2.plot(metrics_history[f'{dataset}_accuracy'], label=f'{dataset}_accuracy')
ax1.legend()
ax2.legend()
plt.show()

10. 在测试集上执行推理#
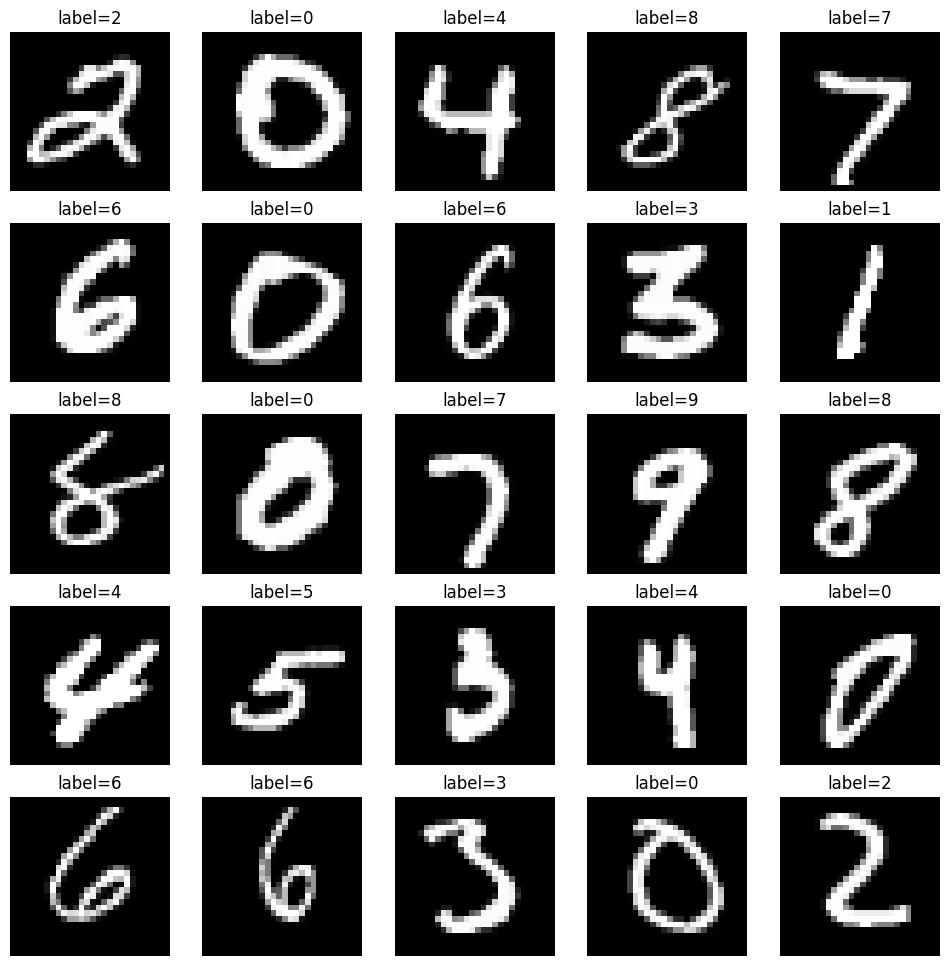
创建一个 jit 编译的模型推理函数(使用 nnx.jit) - pred_step - 使用学习到的模型参数在测试集上生成预测。这将使您能够可视化测试图像及其预测的标签,以便对模型性能进行定性评估。
model.eval() # Switch to evaluation mode.

@nnx.jit
def pred_step(model: CNN, batch):
  logits = model(batch['image'])
  return logits.argmax(axis=1)
请注意,我们使用 .eval() 来确保模型处于评估模式,即使我们在此模型中没有使用 Dropout 或 BatchNorm,.eval() 也能确保输出是确定性的。
test_batch = test_ds.as_numpy_iterator().next()
pred = pred_step(model, test_batch)

fig, axs = plt.subplots(5, 5, figsize=(12, 12))
for i, ax in enumerate(axs.flatten()):
  ax.imshow(test_batch['image'][i, ..., 0], cmap='gray')
  ax.set_title(f'label={pred[i]}')
  ax.axis('off')

恭喜!您已学习如何使用 Flax NNX 在 MNIST 数据集上端到端地构建和训练一个简单的分类模型。
接下来,请查看 为什么选择 Flax NNX? 并开始学习一系列 Flax NNX 指南。


